Categories
Uncategorized

How to Automate Pentesting with Ansible ( Part 2- Information Gathering)

Add Your Heading Text Here

Share it:

Today we will look at how ansible modules allows security engineers to check extensive information of a remote server such as active interfaces (i.e eth0, or wlan0), which security feature is implemented inside the kernel ( whether Apparmor or SELinux), how many partition(s) exist on the hard disk and so on.

Although ansible, as a devops tools, is primarily used for configuration management, server provisioning, and application deployment to production environment just like puppet and the rest, some its modules can be used to gather information. Information gathered by ansible modules could be very useful to security engineers.

Before we start to automate information gathering using ansible module, let’s briefly look at how we can get access to ansible modules and arguments related to these  modules. To find all modules used by ansible, open the terminal and type the following command: ansible-doc  -l
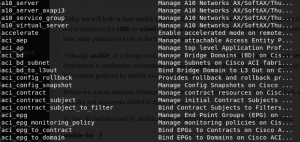
As you can shown in the screenshot above, the previous command we typed at the terminal displayed modules supported by ansible.

Finally, lets use the setup module in ansible to gather information about the target without any infosec tools. Type the command below at the terminal:

ansible -m setup -k -u user2

The command above simply instructs ansible to connect to the target via the IP address provided in the placeholder as user2 and retrieve information related to the target. The -k flag prompts user2 for the password.
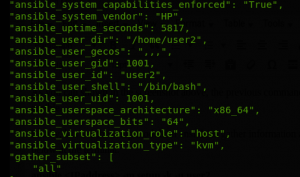
Voila, via the setup module, ansible retrieved extensive information of the target less than a minute. Tomorrow, we will continue to automate information gathering with ansible.

#ISA_informs

#ISA_ltd 

Categories
Uncategorized

How to Automate Pentesting with Ansible ( PART 1- Installation & Configuration)

Add Your Heading Text Here

Share it:

In this day and age, devops tools such as Ansible has made it quite possible for security engineers to automate penetration testing. Although it is quite possible to do the same task with bash shell scripting, it becomes tedious when security engineers are supposed to test hosts on different distributions (such as Suse, CentOS and Redhat) .  We can use ansible to pentest different Linux distributions in the same environment using playbooks.

Today we will focus on how to install ansible on a controller machine in preparation for the main task ahead. There is no need to install ansible on the remote server ( i.e managed machine) we will connect to shortly.

There are several ways of installing ansible. You can choose to install ansible by compiling source code into the usr/local directory, use apt-get utility of Ubuntu or yum or dnf utility of CentOS  to install ansible binary program or install ansible using pip.

For this tutorial, we will install ansible on the controller machine using apt-get and configure it afterwards.

Open your terminal and type the following code:

apt-get install ansible  

Usually ansible is installed into the /etc directory. i.e system configuration directory. After you have installed ansible on your Linux machine, type the following command at the terminal:

cd /etc/ansible 

Inside the ansible directory, type the command below to view files in the ansible directory:

ls ansible  

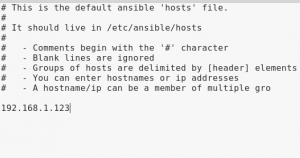
Open the file ‘hosts’ and assign hostname(s) or IP address(es) of remote server you intend to pentest. The ‘host’ file is an inventory file which contains IP address(es) of web servers, database or other infrastructure ansible needs to connect to via ssh. You can choose to open it with any text editor.

leafpad hosts

Now enter the IP address(es) or hostname(s) of remote server(s)  in the format below. Please don’t try to connect to the IP address because it is not valid.

Next, save and close the hosts file. Open the file ‘ansible.cfg’ to make minimal changes. Because we don’t to connect to remote servers  passwordless, uncomment host key_checking by ansible by deleting the # sign beside host key_checking

Now save and close ansible.cfg file.

Finally,  let’s check whether we have configured ansible correctly by connecting to remote server using the ping module. The command below simply tells ansible to connect to the ip address(you must replace the place holder with a valid IP address) using the ping module (i.e -m ping). In addition, -k flag prompts user2 for password before connecting to the target.

ansible   -m  ping -k -u user2

BAM!  Ansible is working correctly. Tomorrow, We will illustrate how we can automate information gathering of a target with ansible.

#ISA_informs

#ISA_ltd 

Categories
Uncategorized

Turning Your Smartphone Into a Spyware Zoo

Add Your Heading Text Here

Share it:
Sometimes even a completely innocent-looking site with a good reputation can be harmful — criminals may find and exploit a vulnerability. For example, they can use the site for drive-by attacks, causing each visitor to download a file automatically (and unwittingly) as soon as they get to the site. For example, Android users interested in current events in the Middle East are at risk of getting a whole menagerie — ZooPark spyware — on their phones.  
 
The current, fourth version of this Trojan can steal almost any information from your smartphone, from contacts to call logs and info you enter by keyboard. Here is the list of data that ZooPark can collect and send to its owners:  
 
 
  • Contacts
  • User account information
  • Call history
  • Call audio recordings
  • Text messages
  • Bookmarks and browser history
  • Browser search history
  • Device location
  • Device information
  • Information on installed apps
  • Any files from the memory card
  • Documents stored on the device
  • Information entered using the on-screen keyboard
  • Clipboard information
  • App-stored data (for example, data from messaging apps such as Telegram, WhatsApp, and imo, or the Chrome browser)

In addition, ZooPark can take screenshots and photos, and record videos on command. For example, it can take a picture of the phone’s owner from the front camera and send it to its command center. 

ZooPark Trojan spyware is used for targeted attacks — in other words, it’s not sent out randomly to ensnare just anyone; it aims for a specific audience. As we said, the criminals behind ZooPark target those who are interested in specific topics — in this case, Middle Eastern politics.  

How To Avoid a Zoo:   

  •        Update your operating system and important apps as updates become available. Many safety issues can be solved by installing updated versions of software.  
  •       Use mobile antivirus software to block suspicious links and apps.

Source: Kaspersky Lab Blog

Categories
Uncategorized

SynAck Ransomware Hunts Enterprise Windows Users

Add Your Heading Text Here

Share it:

SynAck is a ransomware noted for demanding $3,000 from users before decrypting users’ files. Before encrypting a user’s files, SynAck ensures it has access to its important file targets by killing some processes that would otherwise keep the files in use and off limits.

The victim sees the ransom note, including contact instructions, on the logon screen. Unfortunately, SynAck uses a strong encryption algorithm, and no flaws have been found in its implementation, so there is no way yet to decrypt the encrypted files.

SynAck is distributed mostly by Remote Desktop Protocol brute force, which means it’s mostly targeted at business users. The limited number of attacks thus far — all of them in the USA, Kuwait, and Iran — bears out this hypothesis.

How SynAck Ransomware Operates:

It  employs a rather complicated Process Doppelgänging technique.  It is the first ransomware seen in the wild to do so. Process Doppelgänging was first presented at Black Hat 2017 by security researchers.

The technique “Process Doppelgänging” relies on some features of the NTFS file system and a legacy Windows process loader that exists in all Windows versions since Windows XP, letting developers create fileless malware that can pass off malicious actions as harmless, legitimate processes.

Before SynAck start to encrypt files on users’ machine, it checks if it’s installed in the right directory. If it’s not, it doesn’t run — that’s an attempt to avoid detection by the automatic sandboxes various security solutions use.

Secondly, SynAck checks if it’s installed on a computer with a keyboard set to a certain script — in this case, Cyrillic — in which case it also does nothing.

Tips to Avoid Ransomware:

  •  If you do not use Windows Remote Desktop in your business processes, disable it.
  • Back up your data regularly. Store backups on separate media not permanently connected to your network or to the Internet.

Source: Kaspersky Lab Blog